
Shadow Marking Instructions
How to Track the Shadow!
Simple Instructions for Shadow Marking
Attached below are some files that Covenant Calendar Classroom members that have put together to help beginners. To get started with shadow marking, you will need:
Attached below are some files that Covenant Calendar Classroom members that have put together to help beginners. To get started with shadow marking, you will need:
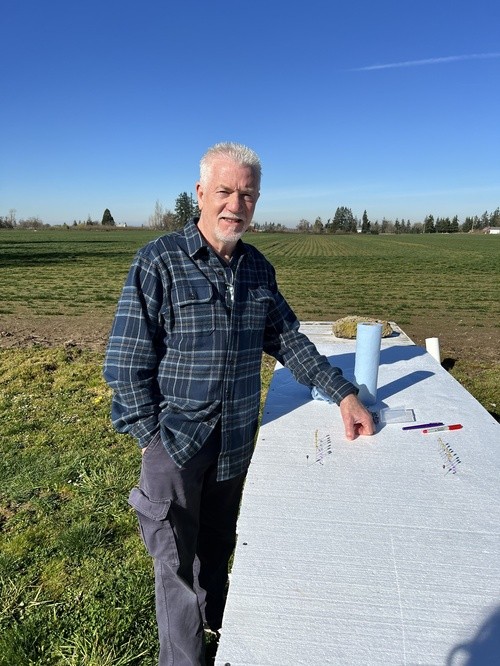
- A marking board (about the size of a poster size)
- A fine tip marking pen (the finer, the better) - at least 4 different colors will be helpful as you'll see in the power point files.
- A gnomon that will cast a shadow (a nail, tall stick pin - anything that you can secure so it will not move) Experiment with different sizes on the same board while you are at it.
- Sewing thread - to pull a line (do not use yarn, and just use a single thread, not doubled)
- A long measure - metre ruler/yardstick - metal is the best.
- A location that will not have shadows from fences, trees, roofs, etc (this is the most challenging part - this is the part you need to have some experimental time to find that "sweet spot" - even if you have to do something on top of the roof, or on top of a fence post - make arrangements for using a corner of a school grounds - maybe a corner of a church parking lot - use your imagination if your yard just will not work. But do try in your yard, as you may be surprised there is a spot between the trees somewhere that will work. The board should be as level as possible and you will want to position the length of your board in the "east/west" direction, as the sun moves across the sky. The board does NOT have to be exactly east/west. The board also has to be secured so it does not move, and if you think there will be rain - you need some way to cover and protect it to prevent it from warping. (Also, you will want to make sure outdoor animals [like cats] don't decide to use it for a scratching post.)
- If you can get a few pieces of plastic corrugated signage material - that works really good (is not affected by moisture) - easy to nail to the ground, or aven clamp to a table. In the files you will see where the gnomon is placed - that position is quite flexible. Finding the sweet spot without shadows from morning to evening is what will take the most time. The rest is easy - and fun! After the first day of tracking the shadow, you will easily see if you want to reposition the gnomon, or add another gnomon. Do 2 different sizes while you're at it.
- Marking Points: The most important marking points are: 1st thing in the morning; high noon [a must]; and last shadow marking in the pm. Place stickpins, or push pins at the 3 marks and pull a thread from the first mark, to solar noon, to the last mark (and all pins in between if you have more). Do NOT wrap the thread around the pins - just follow one side. If you decide to mark about every hour even 10-12 days in advance (even every other day - just experiment), you will easily see a pretty curve. Every day the curve will begin to straighten a little more each time, until on the day of the equinox timing, the shadow line will be perfectly straight - until the next day when the curve will reappear - but it will be a flip to the other direction. The straight line shadow is the equinox! The next day begins our new year!
- When pulling your string, think about a bow and arrow (Robin Hood)...you are pulling the "string" across your data set similar to how a string is pulled on a bow and arrow (the resulting patterns should appear the same...people should see a slight "bow" on all days other than the equinox). You will quickly be able to look at the "midday marks" and see if they are away from the string or if they are ON the string. To pull the thread, only a single thread is necessary - of a good contrasting color - and good close-up pictures.
- To calculate solar noon just google: Solar noon in Salem Oregon (your city, state). For Feb 10 (date needed) it comes up as 12:26 pm as an example.
- Camera - you will need to take pictures - keep a file with dates and times - this needs to be well organized so you can compare what is going on from week to week, or day to day in the last 5-7 days of marking from about Mar 14 to 22. You will want to write on your board [or attach a sticky note on the board] with this information: Name/initials; time of each data point marked [it's good to write the time on the board too]; date; location; time zone - so when your data is sent to Nathaniel or Charlene - we can keep track of where the data is from. It is good to mark every hour on the last days of marking - and also mark/record [with a sticky note on the marking board] if something distorted the shadow (a wispy cloud; movement of the board) After marking for a few days you'll figure some of these things out for yourself - you'll just know what to do.
No Comments